
This repository walks you through the steps to install and initialize SDK into your React Native app. When implementing pre-built messaging and calls on the client-side the effort is minimal and customizable with MirrorFly white-label SDK. This read.me file provides the libraries, dependencies, supplementary features and installation steps.
MirrorFly helps build omni-channel communication apps for any kind of business
💬 In-app Messaging - Connect users individually or as groups via instant messaging features.
🎯 HD Video Calling- Engage users over face-to-face conversations anytime, and from anywhere.
🦾 HQ Voice Calling - Deliver crystal clear audio calling experiences with latency as low as 3ms.
🤖 AI Voice Agent - Build custom AI voicebots that can understand, act and respond to user questions.
🤖 AI Chatbot - Deploy white-label AI chatbots that drive autonomous conversations across any web or mobile app.
🦾 Live Streaming - Broadcast video content to millions of viewers around the world, within your own enterprise app.
The requirements for chat SDK for React Native Mobile App are:
- React-Native >= 0.73.0 <=0.79.5
- Node Version >= 18.20.4
- npm - 10.7.0
iOS
You control the React Native New Architecture setting through the Podfile by defining an environment variable. Set the value to '1' to enable the New Architecture or '0' to disable it:
ENV['RCT_NEW_ARCH_ENABLED'] = '0' # Use '1' to enable, '0' to disableWhen CocoaPods runs, it reads this environment variable and configures the native build to use either the Fabric renderer and TurboModules (enabled) or the classic architecture (disabled).
Android
On Android, you toggle the same feature in the gradle.properties file. Set the flag to true to enable the New Architecture or to false to disable it:
newArchEnabled=false # Use 'true' to enable, 'false' to disableGradle reads this property during configuration, and React Native’s build scripts adjust the native modules and rendering pipeline accordingly.
Step 1: Register here to get a MirrorFly User account.
Step 2: Login to your Account
Step 3: Get the License key from the application Info’ section
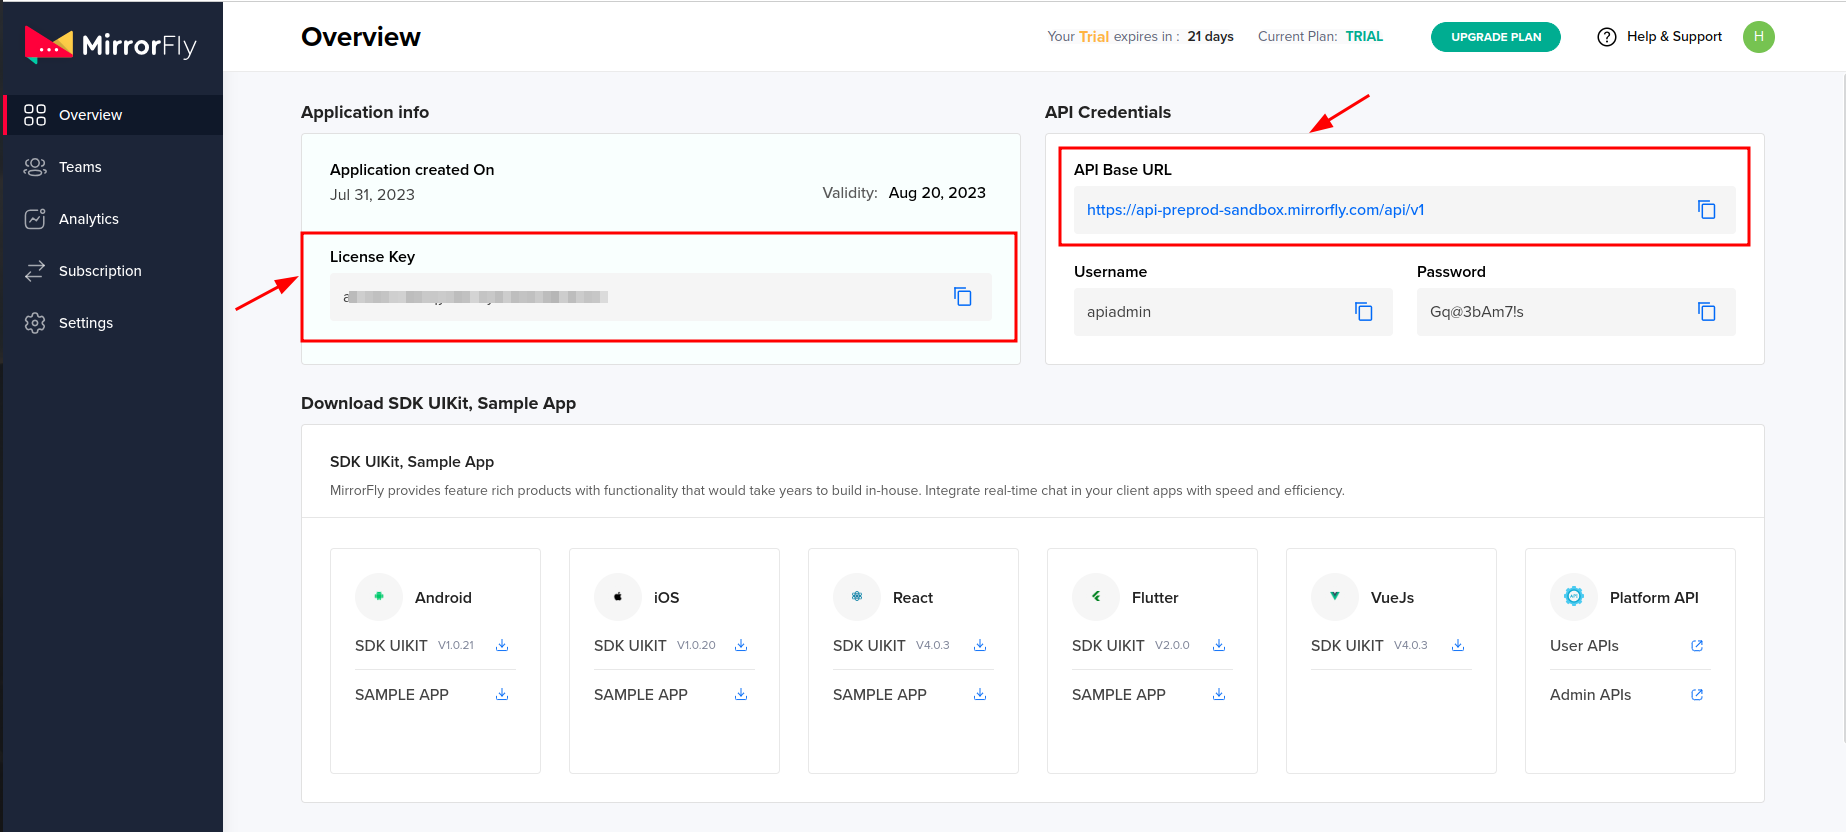
Step 1: Update all your packages.json files.
Step 2: Check your package files for any duplicates if the app isn’t working on iOS.
Step 3: Install MirrorFly SDK in your React Native app.
npm i mirrorfly-reactnative-sdk@2.4.1Step 4: Import the SDK into your application where you want
import { SDK } from "mirrorfly-reactnative-sdk";{
"@react-native-community/netinfo": "^11.4.1",
"react-native-get-random-values": "1.11.0",
"realm": "^20.1.0",
"react-native-fs": "^2.20.0",
"moment": "2.30.1",
"react-native-webrtc": "124.0.4",
"react-native-background-timer": "^2.4.1",
"react-native-permissions": "^5.2.1"
}Before you initialize the real-time React Native Chat SDK, make sure you have the data that tracks changes in the client app’s connection status.
Paste your license key into the licensekey parameter, then use the method below to pass this data to the SDK for processing. In your app file (e.g., App.tsx or App.js), import the SDK and call the initializeSDK function with the required parameters.
const initializeObj = {
  apiBaseUrl: `API_URL`,
  licenseKey: `LICENSE_KEY`,
  isTrialLicenseKey: `TRIAL_MODE`,
  callbackListeners: {},
};
await SDK.initializeSDK(initializeObj);function connectionListener(response) {
if (response.status === "CONNECTED") {
console.log("Connection Established");
} else if (response.status === "DISCONNECTED") {
console.log("Disconnected");
}
}
const initializeObj = {
apiBaseUrl: "https://api-preprod-sandbox.mirrorfly.com/api/v1",
licenseKey: "XXXXXXXXXXXXXXXXX",
isTrialLicenseKey: true,
callbackListeners: {
connectionListener
},
};
await SDK.initializeSDK(initializeObj);{
"statusCode": 200,
"message": "Success"
}Step 1: Download the Android files from the link above, locate the required files, and copy them into the android/app/src/main/java/com directory.
Step 2: Download the iOS files from the link above, locate the required files, and add them to your project in Xcode using Add Files to [Your Project]. Then follow the steps below.
Step 1: You can use the below given method to register a new user.
Step 2: After you register, the system provides a username and password. Use these credentials to connect to the server through the connect method.
const registerObject = {
  userIdentifier,
  fcmtoken,
  voipDeviceToken,
  mode,
  registerMetaData,
  forceRegister,
};

await SDK.register(registerObject);{
statusCode: 200,
message: "Success",
data: {
username: "123456789",
password: "987654321"
}
}Step 1: Use the credentials provided during registration to initiate a connection to the server.
Step 2: When the connection initializes successfully, the server responds with a statusCode value of 200. If the connection attempt fails, the system raises an execution error.
Step 3: You can monitor all connection state changes by implementing the connectionListener callback.
Step 4: If the server connection fails at any point, the callback returns the corresponding error message
await SDK.connect(`USERNAME`, `PASSWORD`);The SDK.connect() method establishes an authenticated session between the client application and the server. The method accepts two parameters: the username and password of the registered user.
It runs asynchronously. The await keyword pauses execution until the connection attempt completes.
If the credentials are valid and the server accepts the request, the function resolves successfully.
If the connection fails due to invalid credentials, network issues, or server-side errors, the function throws an execution error that you can catch using a try-catch block.
{
  message: "Login Success",
  statusCode: 200
}Finally, to send a message to another user you can use the below given method,
await SDK.sendTextMessage(`TO_USER_JID`, `MESSAGE_BODY`, `MESSAGE_ID`, `REPLY_TO`);The sendTextMessage function sends a text payload to a specific user within the messaging system.
- TO_USER_JID identifies the recipient using their unique Jabber ID.
- MESSAGE_BODY contains the actual text content you want to deliver.
- MESSAGE_ID is a unique identifier that the client generates to track the message.
- REPLY_TO is optional. When provided, it references the original message ID that you want to reply to.
- The method runs asynchronously.
- When the send operation succeeds, the promise resolves.
- If the operation fails due to network issues, invalid JID, or server-side errors, it throws an exception that you can capture using a try-catch block.
To receive incoming messages, implement the messageListener callback. This function triggers whenever the client receives a new message or a related event in both one-to-one and group conversations. Register the callback during SDK initialization by adding the following method to your setup configuration.
function messageListener(response) {
  console.log("Message Listener", response);
}Note: Before making the call, make sure you have implemented the helper object.
This guide explains how to initiate, receive, answer, and manage voice and video calls using the SDK.
You can initiate a voice call by passing the callee user JID to the
makeVoiceCall method.
After the call initializes successfully, the callStatusListener
callback is triggered and provides real-time updates on the callee call
status.
await SDK.makeVoiceCall(['USER1_JID']);{
"statusCode": 200,
"message": "",
"callType": "audio",
"roomId": ""
}Initiate a video call by passing the callee user JID to the
makeVideoCall method.
After the call initializes successfully, the callStatusListener
callback is triggered and provides the callee call status.
Caution: If one-to-one calling is not enabled for your plan, the method throws a
403exception.
await SDK.makeVideoCall(['USER1_JID']);{
"statusCode": 200,
"message": "",
"callType": "video",
"roomId": ""
}Register a userTrackListener callback in the caller client to receive
user media tracks.
When you initiate a call, the callback returns: - Your media track - The callee's media track
Use the localUser and userJid parameters to identify which track
belongs to which user.
The callback provides both audio and video tracks.
Pass each track object to the appropriate audio or video element based
on its type.
Register the incomingCallListener callback in the callee client to
receive incoming calls.
When another user initiates a call, the callee receives the call data through this callback.
{
  "allUsers": ["USER1_JID", "USER2_JID"],
  "callMode": "onetoone",
  "callTime": 1681905421215,
  "callType": "audio | video",
  "from": "USER_JID | FROM_USER_JID",
  "groupId": null,
  "localUser": false,
  "roomId": "wmupbheao",
  "roomLink": "ndy-bmkb-eui",
  "status": "calling",
  "to": "FROM_USER_JID",
  "toUsers": ["USER_JID"],
  "userDetails": {},
  "userJid": "FROM_USER_JID",
  "usersStatus": [{}]
}To answer an incoming call, use the answerCall method.
await SDK.answerCall();{
"statusCode": 200,
"message": ""
}To end an active call, use the endCall method.
await SDK.endCall();{
"statusCode": 200,
"message": ""
}Use the declineCall method to decline any incoming call.
await SDK.declineCall();{
"statusCode": 200,
"message": ""
}MirrorFly offers full freedom with the hosting options:
Self-hosted: Deploy your client on your own data centers, private cloud or third-party servers.
Check out our multi-tenant cloud hosting
Cloud: Host your client on MirrorFly’s multi-tenant cloud servers.
Check out our multi-tenant cloud hosting
MirrorFly offers a fully-built client SafeTalk that is available in:
- iOS
- Android
- Developer Documentation
- MirrorFly React Native Solution
- MirrorFly React Native Sample App
- MirrorFly React Native UI Kit
- Product Tutorials
- See who's using MirrorFly
Need a tech team to build your enterprise app?
Hire a full team of experts